Pancake Stack

Happy Pancake Day everyone! If you're anything like us, you're always out to make the most of every food-based holiday, which is why we thought it would be a good idea to share some delicious pancake (or pancake themed) recipes with you today!

Now, the traditional pancake day fare is certainly up for debate in the UK, especially with the rise of American inspired brunch spots, which serve up delicious platefuls of buttermilk pancakes. Regardless of this, there are many who still enjoy a plateful of traditional Shrove pancakes with lemon and sugar (or maybe even some Nutella), leaving us conflicted over what to make! 

Luckily we've decided to avoid the obvious with our chosen pancake recipes today, in order to share a few more unusual recipes to try out this evening! With everything from scrumptious, savoury pancakes, to french toast bakes to choose from, you're sure to find a new and delicious idea to inspire your pancake creation!

Recipes:


Products You May Find Helpful

7 Inch Round Cake Tin
£5.32 inc V.A.T.
Medium Roasting Pan
£10.99 inc V.A.T.
Large Enamel Roasting Pan
£12.29 inc V.A.T.
 

Healthy Chocolate Cookie Recipe

This January, we're sharing ways to enjoy your favourite baking treats, without straying too far from your January diets. Today we have a recipe from EatingWell.com, which uses less sugar, and incorporates filling whole grains, to recreate one of our all time favourite recipes: Chocolate Chip Cookies! Thanks to the addition of slow-release carbohydrates, these cookies make the perfect pre-workout snack for fuelling your next run or fitness session, while also providing a tasty treat that will nourish your body. 

This recipe was created by Beverley Sharpe, who also suggests replacing the oats in the recipe with almond meal, for those who are looking to increase their protein intake. To find out how to make this delicious recipe, or to discover more healthy recipes to see your through January, visit the EatingWell website

 Photo Credit: EatingWell.com

Products You May Find Helpful

Square Baking Seet
£4.99 inc V.A.T.
Slide Off Baking Sheet
£6.95 inc V.A.T.
Large Cooling Rack
£3.60 inc V.A.T.

Brownie & Raspberry Cheesecake Squares

Summer is now nothing but a distant memory, and we've got many cold, wet and dreary days ahead of us. So, with that in mind, if you're looking for something to brighten up your day, then this week's featured recipe is perfect for you! It'll have you feeling all warm and cosy in no time.

This week's recipe is from the terrific Becky's Biscuit Bases. It's a bit different from your regular cheesecake; as instead of featuring a biscuit base, it features a brownie base! Here at British Bakeware we're strong supporters of this combination, and we bet it tastes as good (if not better) as it sounds! This recipe is super easy to follow, and even a novice baker will be able to give this a go. 

If you wish to take a look at some recipe's that are similar to this Brownie & Raspberry Cheesecake Squares recipe, then we highly recommend that you head over to Becky's blog! Her blog features tons of fantastic cheesecake recipes that are really simple to follow and taste delicious!

Ingredients:

For the Brownie Base

  • 225g Plain Flour
  • 1/2 tsp of Baking Powder
  • 1/2 tsp of Salt
  • 400g of Caster Sugar
  • 225g of Unsalted Butter
  • 60g of Cocoa Powder
  • 1 tsp of Vanilla Extract
  • 4 Eggs

For the Filling

  • 250ml of Double Cream
  • 100g of Soft Cheese
  • 3 tbsp of Vanilla Extract
  • 1/2 Punnet of Raspberries

For Decoration 

  • 1/2 Punnet of Raspberries
  • 1/2 Punnet of Blueberries
  • Left Over Brownie

Method:

Step 1 - Preheat the oven to 180°C or gas mark 4.

Step 2 - Line your loose bottom square tin and small loaf tin.

Step 3 - Mix the flour, baking powder and salt together in a large mixing bowl, and set aside.

Step 4 - In a seperate bowl, beat the melted butter, sugar & cocoa powder together. Then pour in the vanilla extract and crack in the eggs. Then beat the mix together until it is well combined.

Step 5 - Once the mixture is well combined, add the flour mix you had made previously in parts, until it's fully combined.

Step 6 - Pour the majority of the brownie mixture into your square baking tin, but save some mix to go in your small loaf tin.

Step 7 - Pour the rest of the mix into your loaf tin. You'll chopping this up later for decoration, so it doesn't matter if it doesn't fully cover the base of your tin.

Step 8 - Place both tins in the oven. Remove the loaf tin after 10 - 15 mins and square tin after 25-30 mins. Leave the larger brownie to cool in the tin.

Step 9 - Once the brownies have cooled, you can begin to make the cheescake filling. Start by whipping the cream, using an electric whisk. Do this until it forms stiff peaks.

Step 10 - Next, fold in the soft cheese and icing sugar until the mixture is thoroughly combined.

Step 11 - Once it's combined, begin folding in the raspberries, but make sure you leave some for decoration. 

Step 12 -  Place the cheesecake brownies in the fridge for 3 hours or over night.

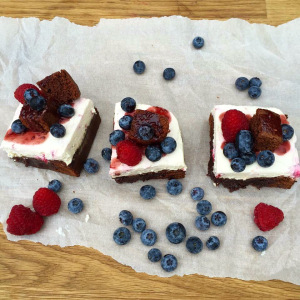
Step 13 - Once the cheesecake has set, remove the brownie from the fridge and cut into nine squares. Decorate with smaller chunks of brownies, raspberries and blueberries.

For a more detailed recipe, along with step-by-step photos to guide you, check out Becky's recipe here.

Products You May Find Helpful

8 Inch Square Cake Tin
£7.40 inc V.A.T.
450g Loaf Tin
£3.95 inc V.A.T.
Large Cooling Rack
£3.60 inc V.A.T.
 

Vanilla Cupcakes & Marzipan Bees

It's a special week on Bake Off this week, because for the very first time, it's Botanical Week! The bakers must complete three challenges inspired by nature and are allowed to use any ingredients that grows to use in their bakes. Keeping with this theme, we thought we'd share a flowery based recipe that you can bake at home.

This week, why not have a go at making these spectacular Vanilla Cupcakes? Created by the extremely talented Jamie from Jamie's Cookery, each of these fantastic cupcakes has been topped with a beautiful buttercream rose and features a marzipan bee. They're a great way to celebrate the last few days of summer. 

Not only do these cupcakes look great but they're also extremely easy to make! For more tasty recipes that are really easy to follow, we highly recommend that you head over to Jamie's blog; it's brimming with spectacular recipes!

Ingredients:

Makes 12 cupcakes

For the Cupcakes

  • 175g of Butter
  • 175g of Caster Sugar
  • 175g of Self-Raising Flour 
  • 3 Eggs
  • 1tsp Vanilla Extract

For the Buttercream

  • 180g Butter
  • 450g Icing Sugar
  • 1 tsp Vanilla Extract
  • 2 tbsp Milk, if needed

For the Marzipan Bees

  • 1 Egg Yolk
  • 1 tsp Honey
  • 1tsp Fresh Orange Juice (or apple juice)
  • 100g Ground Almonds
  • 50g Chocolate, melted
  • Some Flaked Almonds

Method:

Step 1 - Pre-heat the oven to 175°C and place 12 cupcake cases into a cupcake or muffin tray, and set aside.

Step 2 - Then, add the butter and caster sugar in to a bowl and mix well until they have all combined.

Step 3 - Add the vanilla extract and the eggs - one at a time - mixing well after each egg.

Step 4 - Finally, add the flour to the mixture and mix well - ensuring that you get all the flour off the edges of the bowl! This should provide you with a nice smooth batter.

Step 5 - Spoon an equal amount of batter in to each case and pop them into the oven for around 12 - 15 minutes or until they are firm and golden brown. Once baked, put aside to cool.

To make the Buttercream

Step 1 - Put icing sugar, butter and vanilla into a mixing bowl and beat until a smooth thick buttecream is formed. If the buttercream is too stiff, then add a little milk to loosen it. If you want to do different coloured icing, divide your buttercream and use food colouring to reach your desired colour for each batch.

To make the Marzipan Bees

Step 1 - Put all of the marzipan ingredients into a bowl and mix them until a firm ball is made.

Step 2 - Then, roll twelve individual balls from this mixture - this will be your bees.

Step 3 - Stick two flaked almonds into each bee to make the wings.

Step 5 - Put your melted chocolate into a piping bag, snip off the end and use it to create stripes and eyes to complete your bees.

To decorate

Step 1 - Spoon the buttercream into a piping bag fitted with a Wilton 2D nozzle, then use it to pipe buttercream roses. To do this, start from of the cupcake and make a couple of outward circles, stopping when you reach the edge of the cupcake.

Step 2 - Place a marzipan bee on to each cupcake.

Step 3 -Enjoy!

Products You May Find Helpful

Cupcake Tray
£7.76 inc V.A.T.
12 Cup Muffin Tray
£13.86 inc V.A.T.
Individual Muffin Cups
£6.26 inc V.A.T.
 

Earl Grey Shortbread Teabags

Today we bring to you a brilliant Earl Grey Shortbread Teabags recipe from the equally brilliant Ellie's Kitchen. Ellie is very talented baker and her blog is crammed with a whole range of recipes, from hand painted sugar cookies to homemade strawberry jam, you're bound to find a recipe you love on this blog. 

It would come as no surprise to you that here at British Bakeware we're huge lovers of tea, so we're extremely excited to share this recipe with you. These earl grey flavoured shortbread biscuits are really simple to bake and they take no time at all to make! They're the perfect teatime treat for tea lovers!

This fantastic recipe and image is from Ellie's Kitchen and we highly recommend you take a look at her blog if you're looking for some inspiration on your next bake!

Ingredients:

  • 200g Unslated Butter, softened
  • 100g Caster Sugar
  • 300g Self Raising Flour
  • Drop of Vanilla Extract
  • Tea from 3 Earl Grey Teabags
  • 50g Dark or Milk Chocolate

Method:

Step 1 - Preheat your oven to 160ºC

Step 2 - then cream the butter and sugar together - you can either do this by hand or if you have an electric mixer, you can use that. The mixture should look pale and smooth.

Step 3 - Once you're happy with the mixture, add the vanilla and tea.

Step 4 - Start gently working in the flour. To avoid overworking the mix, it's best to do it by hand.

Step 5 - Form the into a ball but don't worry if it doesn't together straight away, you just have to be patient.

Step 6 - Lightly flour a flat surface and roll out the dough. Make sure it's about 5mm thick.

Step 7 - Cut the dough into teabag shapes. You may want to use a template to cut around.

Step 8 - Stamp out a hole at the top of each teabag. 

Step 9 - Leave to chill in the fridge the fride for 15 mins before baking until the biscuits turn golden brown. This will take around 15 minutes.

Step 10 - Leave the biscuits to cool for a few minutes on the baking tray, once the're cooked before you transfer them to a wire rack to cool fully.

Step 11 - Once cooled, dip the bottom half of each biscuit in melted chocolate and leave to set on baking paper. 

Step 12 - To finish, thread string through each biscuit and add labels.

For the full the recipe, visit Ellie's blog here.


Products You May Find Helpful

Slide off Baking Sheet
£6.95 inc V.A.T.
Biscuit Baking Tray
£9.95 inc V.A.T.
Large Cooling Rack
£3.60 inc V.A.T.