Fish Pie

It’s the ultimate winter warmer, and it’s surprisingly simple to make – just follow our recipe!

Photograph by Gordon Joly (view original here)

Ingredients:

  • 2 white fish fillets (520g)
  • 200g prawns
  • 600ml whole milk
  • 4 eggs
  • 100g butter
  • 50g flour
  • 3-4 large Russet potatoes
  • 50g cheese
  • Parsley

Instructions:

Step 1 - Preheat your oven to 200oC (or 180oC if it's a fan oven).

Step 2 - Hard-boil two eggs in a saucepan (click here for a simple guide to hard-boiling).

Step 3 – While you’re waiting for the eggs to finish, put both fish fillets in a frying pan and pour the milk over them (IMPORTANT: Save 100ml of milk for later – you’ll need it for Step 10). Simmer on a low heat for 10 minutes.

Step 4 – Use a spatula to remove the fillets and place them on a plate to one side. Pour the milk from the frying pan into a jug.

Step 5 – Take a pie tin or baking dish and, using a fork, flake the fish into this container. Add the prawns as well.

Step 6 – Once your eggs are ready, peel them under the cold tap, slice them into quarters, and place these quarters on top of the fish.

Step 7 – Chop up your parsley and sprinkle this into the dish.

Step 8 – Put half (50g) of your butter in a frying pan and cook it over a medium heat for about a minute, stirring in the flour as it melts. You’ll also want to start boiling your potatoes at about this point – put them in a saucepan full of water and pop them on the hob for about 20 minutes.

Step 9 – Gradually add the jugful of milk that you cooked with the fish, stirring as you go. Cook the sauce for 5-6 minutes (don’t stop stirring!) – once it’s nice and thick, pour it over your fish.

Step 10 – Are your potatoes boiled? Great! Now mash them up with the butter that’s left over from Step 8 and the milk that you kept to one side in Step 2.

Step 11 – Use a palette knife to ‘ice’ the fish pie – spread the mashed potato over the top of your dish, making sure to go all the way to the edge. Grate the cheese over the top, bake in your pre-heated oven for 30 minutes, and serve piping hot!

Products You May Find Helpful

£3.02 inc V.A.T.
£4.82 inc V.A.T.

It’s the age-old debate: does the word ‘scone’ rhyme with ‘cone’ or ‘gone’? We’re not wading into that argument today – instead, we’re just here to serve up another tasty recipe!

If you’ve only ever had your scones with clotted cream and jam, it’s high time you tried some savoury scones. This recipe is great for a light lunch with friends – it makes about 16 scones – and vegetarians can obviously leave out the bacon if they like.

Photograph by Matt Smith (view original here)

Ingredients:

  • 80g butter
  • 100g cheddar cheese
  • 250ml milk
  • 3 bacon rashers
  • 450g self-raising flour

Instructions:

Step 1 - Preheat your oven to 200oC.

Step 2 - Grease a baking tray with butter or margarine (or just use a non-stick baking tray). If you are cooking these scones without bacon, skip to Step 5.

Step 3 - Cut the fat off your bacon and cut it into small pieces.

Step 4 - Fry the bacon pieces in a pan over a moderately high heat. Once the bacon begins to turn crispy, remove it from the pan and place it onto a plate to cool down (use kitchen roll to remove any excess grease).

Step 5 - Sieve your flour into a mixing bowl.

Step 6 - Cut the butter into small cubes and rub these cubes into the flour. Keep going until you are left with a breadcrumb-like mixture.

Step 7 - Grate your cheese into the mixing bowl. Add the bacon too, if you're using it. Mix thoroughly with a spoon or whisk.

Step 8 - Add the milk to your bowl and mix until the mixture forms a soft dough that can be easily kneaded.

Step 9 - Sprinkle some flour on your kitchen surface and tip the contents of your bowl onto this surface. Knead the dough with your hands until it is smooth.

Step 10 - Use a cookie cutter to cut scone shapes out of the dough (as we mentioned earlier, there should be enough dough for roughly 16 scones). Place these on your baking tray and cook for 20 minutes in the pre-heated oven.

The scones should be a golden-brown colour when you take them out of the oven. Cut each one in half, spread some butter on the inside, and serve 'em while they're still nice and warm!

Products You May Find Helpful

Baking is a fun and exciting family-friendly activity that all ages can enjoy, especially when the end product is so delicious. That's why we love this BBC Good Food recipe for Delicious Sweet Buns. It's a great way to get children excited about cooking and the sweet buns are simply delicious!

These Delicious Sweet Buns are soft, tasty and filled with a delicious filling; the perfect after dinner treat.

Ingredients:

For the Dough

  • 250g plain flour
  • 5g yeast
  • 25g sugar
  • 1/2tsp salt
  • 110ml warm water
  • 1 whole egg, beaten and then divided
  • 25g butter, softened

For the Filling

  • 1/4 cups strawberry jam
  • 1/4 cups candied mixed fruit

Instructions:

Step 1: In a large mixing bowl add the flour, yeast, sugar and salt. Mix for 1 minute (by hand or using an electric whisk). Add the water and half of the beaten egg mixture. Mix once again until you get a thorough consistency. Add butter and mix in until combined. Knead by hand until smooth and elastic. This should take about 10 minutes.

Step 2: Cover the dough and pop it in a warm place for about 30 minutes to let it rise. After that, punch the dough down and roll out 8 balls. Allow them to rise for 10 minutes.

Step 3: Take each ball and roll out with a rolling pin until you have a nice thin disk (roughly 3 inches in diameter and a 1/4 inch thick).

Step 4: Place some strawberry jam and sprinkle some candied mixed fruit on the top of the disk. Wrap and cover the filling from all sides with the dough before pinching the seams to close. Next shape the dough into a ball shape. Using shark scissors snip the top surface of the dough a bit to form petals shaped like a flower (see picture). You can use the scissors to form a variety of fun shapes, all of which look great!

Step 5: Place buns on a greased metal tray and allow them to rise for 20 mins. Then brush the remaining beaten egg over the top of the buns. Bake at 200c for 20 minutes or until golden brown.

Source: http://www.bbcgoodfood.com/recipes/1913636/homemade-sweet-buns 

Products You May Find Helpful

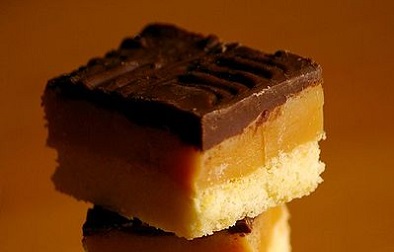
Millionaire's Shortbread

Millionaire’s shortbread is a delicious, three-level treat: rich chocolate, creamy caramel, and a pleasantly crunchy layer of biscuit, all in one amazing package!

Why is it called Millionaire’s shortbread? Because the ingredients are rich, and it tastes like a million dollars! Still, it won’t taste like two cents unless you make it right, so follow our easy recipe and make sure that your shortbread is as sumptuous as it should be!

Photo by Aurore D (view original here)


Ingredients:

  • 100g chocolate (milk or dark)
  • 120g caster sugar
  • 170g flour
  • 240g butter
  • 2tbsp golden syrup
  • 400g condensed milk

Instructions:

Step 1 - Preheat your oven to 170oC.

Step 2 - Grease a square cake tin with butter or margarine.

Step 3 - Sieve the flour into a bowl, along with half (60g) of the caster sugar.

Step 4 - Using your hands, rub half (120g) of the butter into the bowl until the mixture forms into dough.

Step 5 - Spread this dough evenly across the base of your square cake tin. Prick the dough all over using a fork.

Step 6 - Put the dough in the preheated oven for 15 minutes. It should be golden brown by the end of the cooking period.

Step 7 - Once the cake tin is in the oven, it's time to make the caramel! Place your condensed milk, your golden syrup, and the remaining sugar and butter in a saucepan. Use a low flame and stir continuously.

Step 8 - Is the caramel properly mixed? If so, remove it from the hob and - once your dough is out of the oven - pour it into the cake tin, covering the dough evenly. Leave to cool for half an hour.

Step 9 - While the caramel cools, boil some water on the hob. Break your chocolate into small pieces and place these pieces in a glass bowl. Set the bowl over the boiling water to melt the chocolate.

Step 10 - Once your caramel has cooled, pour the melted chocolate over the top to form that delicious third layer. Pop the finished product in the fridge for a while, and when it's cooled down properly, cut into squares.

Products You May Find Helpful

£6.59 inc V.A.T.
£7.40 inc V.A.T.
£6.36 inc V.A.T.

Roast Chicken

This slight twist on your standard roast chicken really brings the bird alive! A few additional ingredients and care means you can turn your chicken into the star of the show. The great thing about this flavourful bird is that it is so versatile you can literally serve it with what you like.

Photo by James D Kirk (view original)

Ingredients 

  • 1 medium to large free range chicken
  • 1 bulb of garlic
  • 1 unwaxed lemon
  • A few springs of rosemary
  • 3 knobs of butter
  • Salt and freshly ground black pepper

Instructions

Step 1 – Wash the chicken thoroughly, and then with a sharp knife make a deep incision on each side of the bird where the thigh meets the breast – this is the thickest part of the chicken and will ensure it cooks quicker and more evenly.

Step 2 – Using one knob of butter coat the entire chicken, then push the remaining two under the skin, one on top of each breast.

Step 3 – Cut the lemon in half and squeeze one half all over the chicken, and then put the remaining half into the cavity of the chicken.

Step 4 – Bash the bulb of garlic with the end of the knife so the skins of the cloves split, and then place the bulb in with the lemon into the cavity.

Step 5 – Sprinkle the sprigs of rosemary over the top of the chicken, and season it well.

Step 6 – Place your prepared chicken in a pre-heated oven following the instructions given on the packet, or until the skin is crisp and juices from the thigh run clear. 

Products You May Find Helpful

£8.86 inc V.A.T.
£11.99 inc V.A.T.
 
£12.56 inc V.A.T.