This week is National Curry Week and what better way to celebrate than cooking a delicious homemade curry in the shape of this spiced chicken balti.
Here at British Bakeware, we appreciate how busy life can be between work, household chores and picking the children up from school, and that’s before you start on the rest of the list! Well we have chosen a fantastic recipe from the good people over at BBC Good Food to help you celebrate National Curry Week 2015. The great thing about this recipe is that it can be prepared and cooked in just 35 minutes, which is no longer than a normal weekday meal would take. Featuring quinoa, which is a great source of protein, cashew nuts, coriander, chopped tomatoes, chicken and curry paste, this chicken balti is guaranteed to put a smile on your family and friends’ faces.
Ingredients:
- 4 chicken breasts
- 2 large onions
- 4 tbsp of Balti curry paste
- 200g quinoa
- 400g of chopped tomatoes
- 1 litre of chicken stock
- 50g of salted cashew nuts
- 1 tbsp of sunflower oil
- Small bunch of chopped coriander leaves
Instructions:
Step 1-To start your national curry week celebrations, simply heat the sunflower oil in a large frying pan or wok and add the onions. Fry until they are soft then set them to one side on a plate.
Step 2- Cut the chicken breasts up in to chunks and add to the frying pan, cooking them until the juices run clear. Then add the Balti paste and quinoa as well as the onions. Allow this to cook for a couple of minutes more before pouring in the 400g of chopped tomatoes.
Step 3- Allow the curry to simmer for around 25 minutes to half an hour until the quinoa is tender and has soaked up all of the delicious flavours.
Step 4-Just before serving this brilliant spiced chicken balti, add the cashew nuts and coriander along with salt and pepper to taste.
Source: BBC Good Food
It’s the final of the Great British Bakeoff this evening with Ian, Nadiya and Tamal battling it out for the chance to be the champion of the Great British Bakeoff 2015!
With what is sure to be a fantastic final, we can expect iced buns and classic British cakes! So we sat in the British Bakeware office thinking of typically British cakes. We all came up with the Victoria Sandwich Cake, but one that also stood out was a bakewell tart. However, we didn’t choose any old bakewell tart recipe, we chose this fantastic raspberry bakewell tart by BBC Good Food, as it puts a brilliant twist on the traditional bakewell tart recipe.
Ingredients:
For the Bakewell Tart Filling
- 500g pack of shortcrust pastry
- 100g of softened butter
- 100g of caster sugar
- 2 large eggs
- 140g of raspberry jam
- 100g of ground almonds
- 50g of fresh white breadcrumbs
- Half a tsp of almond extract
- The juice and zest of 1 lemon
- Flour for dusting
For the Custard Filling
- 250g of icing sugar
- 350g of fresh raspberries
- 1 tbsp of toasted flaked almonds
Instructions:
Step 1-Roll out the shortcrust pastry on a work surface, using some flour to ensure that the pastry doesn’t stick. Once you have rolled out your pastry, use it to line a 26cm tart tin. Cover this with cling film and place in the fridge to rest for an hour or so.
Step 2-Heat your oven to 190 degrees celcius/170 degrees celcius for a fan oven/gas mark 5..
Step 3- Start making the filling of your raspberry bakewell tart by placing the softened butter, caster sugar and lemon juice in to a food processor. Mix this together until it turns light and fluffy. Turn the food processor to full speed and add the eggs and the almond extract. Mix again until it is well combined and takes the consistency of a smooth paste. Then gently fold in the breadcrumbs and ground almonds.
Step 4-Remove the tart case from the fridge and line it with baking paper and baking beans. Place on an oven tray and bake for 20 minutes or so until the sides are set. Remove from the oven and take out the baking beads and baking paper. Place back in the oven to bake for another 10 minutes until the base is a biscuity consistency.
Step 5- Take the bakewell tart base out of the oven and spread the raspberry jam on the base and top with the filling you prepared earlier. Place this back in the oven and bake for a further 25 minutes or until the filling is cooked.
Step 6-Once the raspberry bakewell tart has cooled, remove it from the tin by carefully tipping the bottom of the tin out. Place the tart to one side. Prepare the icing for the tart by adding 5 tbsp of water to the icing sugar. Cover the top of the raspberry bakewell tart will icing, leaving some to one side. Place the fresh raspberries on top before adding the remaining icing and any leftover almonds. Allow the icing set before slicing and serving.
Source: BBC Good Food
Products You May Find Helpful
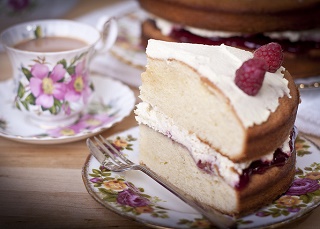
The penultimate instalment of our free-from baking month comes from this fantastic vegan Victoria sponge cake! This brilliant recipe from Tesco Real Food is definitely worth a try at home.
Everyone loves a slice of Victoria sponge from time to time don’t they? Well this vegan Victoria sponge recipe is too good not to try at home. The recipe from Tesco Real Food is free from eggs and dairy, making it a perfect treat to accompany an afternoon cup of tea! The dairy-free spread for the buttercream and dairy-free milk are substituted in for regular butter and milk, but you will barely notice the difference. The delicious taste of this vegan Victoria sponge cake is typically British and we love it, so thank you Tesco Real Food for the recipe! If you want to try making it at home, why not take a look at our cake tins for inspiration!
Photo by Carwyn Lloyd Jones (view original here)
Ingredients:
For the Sponge
- 400g of self-raising flour
- 1 and a quarter tsp of bicarbonate of soda
- 250g of caster sugar
- 400ml of dairy-free milk
- 115ml of sunflower oil
- 2 tsp of vanilla extract
- 3 tbsp of golden syrup
- 4 tbsp of strawberry jam
- 150g of strawberries cut in to quarters for decoration
For the Buttercream
- 200g of dairy-free spread
- 175g of icing sugar
Instructions:
Step 1-Preheat your oven to 180 degrees celcius, 160 degrees celcius if you have a fan assisted oven or gas mark 4. Grease and flour a couple of Victoria sandwich tins if you have one, such as our sandwich pan or a cake tin works just as well if you haven’t got one. Line with baking paper ready to bake later on.
Step 2-Take a mixing bowl and sift in the flour, caster sugar and bicarbonate of soda. In a separate mixing jug, mix together the dairy-free milk (almond or soya milk is perfect), the sunflower oil, golden syrup and the vanilla extract before pouring it in to the dry mixture in the mixing bowl. Mix together using an electric handheld blender until the mixture is a lot thicker.
Step 3-Once you are happy the mixture is well combined and has reached a deliciously creamy consistency, transfer in to the sandwich pans or cake tins that you prepared earlier and bake for no more than 45 minutes until they have risen nicely.
Step 4-Once the sponges are cooked through, remove them from the oven and allow them to cool for 15 minutes in the sandwich pan before removing.
Step 5-Make a start on the buttercream filling while the cakes are cooling. In a mixing bowl, add the dairy-free spread, icing sugar and vanilla and mix until combined. Place in the fridge until later on.
Step 6-Take the 4 tbsp of strawberry jam and spread it over half of the cake. Do the same with around two thirds of the buttercream. Place the other half of the sponge on top and spread any remaining buttercream on top of the sponge along with the quarters of strawberry as decoration.
Step 7-Now all there is left to do is cut yourself a slice of this delicious vegan Victoria sponge cake to go with your afternoon cup of tea or coffee. Enjoy!
Source: Tesco Real Food
Products You May Find Helpful
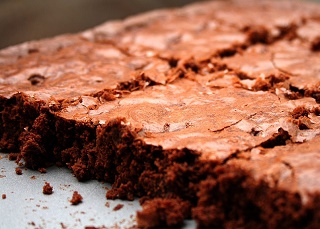
We are continuing with the free-from baking this week with these fantastic dairy-free chocolate brownies, quick, easy and absolutely delicious!
So far we have covered gluten-free with the Jamie Oliver gluten-free coffee cake recipe and sugar-free with the sugar-free lemon drizzle cake, so now it is time for something dairy-free, as was featured on the Great British Bake off a few weeks ago. These dairy-free chocolate brownies are a must try and there is no excuse not to as they take just 40 minutes to prepare and bake! This dairy-free chocolate brownies recipe is also egg free and also includes chopped walnuts for some added crunch! A perfect accompanying snack for your afternoon cup of coffee, these dairy-free chocolate brownies from Tesco Real Food are a must try!
Ingredients:
- 50g of chopped walnuts
- 150g of self-raising flour
- 125g of caster sugar
- 100g of dairy-free chocolate buttons
- 100g of dairy-free sunflower margarine
- 400ml of soya milk
- A pinch of salt
- Half a tsp of lemon juice
Instructions:
Step 1- Preheat your oven to 180 degrees celcius/160 degrees celcius in a fan oven/Gas mark 4. Take some of the dairy-free margarine and grease the bottom and sides of our brownie tray.
Step 2-In a large mixing bowl, add the chopped walnuts, self-raising flour, the caster sugar and a pinch of salt and mix together well.
Step 3-Then in a saucepan, break up the chocolate buttons and put them in a saucepan with the margarine. Melt these over a low heat before stirring in the soya milk and lemon juice until the mixture is well combined.
Step 4- Pour this mixture in to the mixing bowl and mix together for a few seconds until combined.
Step 5- Once you are happy the mixture is well combined, pour it in to the brownie tray. Smooth the mixture out with a spoon or a spatula. Bake for between 20 and 25 minutes.
Step 6-Once cooked, allow these delicious dairy-free chocolate brownies to cool in the tin before cutting and serving. Enjoy!
Source: Tesco Real Food
Products You May Find Helpful
Following on from the Great British Bake Off last week, we thought we would share this brilliant sugar free cake recipe with you from the equally brilliant people at BBC Good Food.
The theme on the Great British Bake Off last week was free from baking and we have decided to continue running that theme for the whole month of September! We chose this sugar free lemon drizzle cake because it was such a simple recipe which produces a delicious cake for you to enjoy and it’s all sugar-free! The substitute of xylitol for sugar is fantastic as it helps you cut out that little bit of sugar from your diet, but you still get to enjoy a delicious sugar free lemon cake at the end of it!
Ingredients:
For the Cake
- 225g of self-raising flour
- 225g of xylitol
- Zest of 2 lemons
- 2 large eggs
- Half a tsp of baking powder
- 1 tbsp of milk
- 125ml of sunflower oil
- 200g of 0% fat Greek yoghurt
For the Lemon Drizzle
- The juice of 1 lemon
- 50g of xylitol
Instructions:
Step 1-Preheat your oven to 180 degrees celcius/160 degrees for a fan oven/gas mark 4. Grease a 2lb loaf tin and line in with baking paper. If you haven’t got a 2lb loaf tin, a 25cm large bread tin or even a 450g loaf tin is fine, but you will need to reduce the measurements of the ingredients. Add the 22g self-raising flour, half a tsp of baking powder, the 225g of xylitol and lemon zest to a mixing bowl and combine.
Step 2-In a different bowl, mix the 125ml of sunflower oil, 200g of Greek yoghurt and tbsp. of milk then stir it in to the flour mixture.
Step 3-Add the mixture in to the 2lb loaf tin and smooth it over ready to bake. Place in the centre of your pre-heated oven and bake for between 1 hour and 1 hour and 10 minutes. Please keep an eye on the cake as you don’t want it to become too dark. If you see this happening, cover it with a large piece of tin foil.
Step 4-As the cake gets closer to the 1 hour baking time, start the lemon drizzle by heating the lemon juice and 50g of xylitol over a low heat until it starts to dissolve. Once you are happy the cake is cooked, take it out of the oven and pour the lemon drizzle over the cake.
Step 5-Allow the cake to cool in the 2lb loaf tin before removing it and letting it cool further on a small cooling rack.
Source: BBC Good Food
Products You May Find Helpful