The BBC Good Food Summer Show arrives at the NEC in Birmingham on 11th June and is there until 14th June. Featuring a host of big stars across the 4 days such as Mary Berry, Michel Roux Jr, James Martin and Tom Kerridge, you will see some spectacular food prepared right before your eyes, inspiring you to go home and do some summer cooking of your own.
To see all of these big names, you will need to get yourself to the super theatre at particular times with Mary Berry there on Friday 12th June only and Michel Roux Jr only there on Saturday 13th June, so get tickets in plenty of time to avoid disappointment!
If you get a bit peckish while you are there (we would be surprised if you didn’t get hungry with a host of celebrity chefs cooking some fantastic food!), you can always head over to the BBC Good Food kitchen for a spot of lunch. Serving up delights such as buttermilk roasted Poussin for main course and strawberry, cherry and amaretto meringue cake for dessert, you will not be disappointed with the food on offer, and it available for a fantastic price!
For more information on this brilliant event and what you can expect to see there, simply click here!
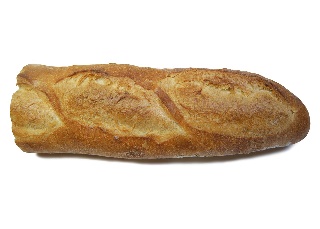
The winter months are now upon us and baking homemade baguettes are the perfect way to keep warm. Couple that with a delicious homemade casserole or a bowl of winter warming soup and it will be perfect!
Is there anything better than homemade bread? We struggled to find anything when we asked ourselves that question in the British Bakeware office! As winter has well and truly arrived, we thought we would choose our favourite recipe for making bread to help keep you nice and warm, and what better recipe to choose than one from the brilliant Paul Hollywood. These homemade baguettes may seem like a lot of work, but if you follow each step carefully and don’t over handle the dough, you will be left with a fantastic freshly baked baguettes! Also, by using the fantastic baguette tin you will find in our bread baking section, the task of making baguettes becomes a lot easier!
Ingredients:
- 500g strong white bread flour
- 10g salt
- 10g instant yeast
- Olive oil
- 370ml cool water
Instructions:
Step 1- Lightly oil a 2-3 litre square plastic container. It has to square to help shape the dough!
Step 2- Take the bowl of your electric mixer and add the white bread flour, salt and yeast. It is important that you do not pour the salt immediately on top of the yeast. Also add three-quarters of the water and the olive oil, and slowly start to mix. When the dough starts to bind, add the remaining water and mix for a further 5 to 8 minutes until the dough forms an elastic consistency.
Step 3- Then add the dough to the lightly oiled square plastic container, and cover it with a tea towel. Leave the dough until it has doubled in size. This should take no more than 1 hour.
Step 4-At this point, line two baking trays with baking paper. Our baguette tins will also work really well here!
Step 5-Pick a work surface in your home and coat it with olive oil. Then carefully place the dough on to the surface and handle it gently so to keep as much of the air in the dough as possible. The dough should feel quite wet when you touch it, but should also contain plenty of air inside.
Step 6-Split the large piece of dough in to 4 or 5 smaller pieces. Make each piece of dough in to an oblong shape by making it flat and folding the sides in to the centre. Then roll each of the 5 pieces of dough in to longer sausage shapes. The top of the dough should be smooth with a join along the length of the base. Starting in the middle of each piece of dough, carefully roll each piece of dough with your hands until they fit the baking trays or the baguette tins you are using.
Step 7-If you are using baking trays, place two or three baguettes on each tray and place inside a plastic bag to prove for 1 hour until it doubles in size. Or you could use our baguette tin which is large enough to hold two baguettes. You will be able to tell it is done as the dough will be springy to touch.
Step 8-Preheat your oven to 220 degrees celcius and place a large roasting pan in the bottom to give it time to heat up.
Step 9-Once the dough has proven nicely, dust each one with flour and score each one a few time diagonally. Fill the large roasting pan at the bottom of your oven with hot water and return to the oven. This will create steam that is very important for the bread to bake properly. Bake the baguettes for 25 minutes until they turn a delicious golden brown colour.
Step 10- Allow these delicious homemade baguettes to cool for 1o0 to 15 minutes before you serve them as part of your celebration of National Picnic Week!
Source: Paul Hollywood
Products You May Find Helpful
Who doesn’t love chocolate? Well the combination of chocolate and chilli is now more popular than ever in both sweet and savoury cooling and this fantastic chocolate and chilli tart is one of those chocolate desserts that must be tried and the added kick from the chilli is something that we absolutely love. The recipe comes from Great British Chefs and it didn’t take long for us to decide that we had to share it with you all!
This recipe is a brilliant way to bring some much needed heat to kick start our British summer! You may look at this recipe and think to yourself that surely chilli doesn’t go with chocolate? You’ll have to trust us as the combination is too good to turn down! The rich taste of the dark chocolate combined with the buttery pastry is heavenly, and that’s before the chilli adds a fantastic kick! The lime zest and crème fraiche finish off what is a fantastic combination of flavours, contributing to a brilliant dessert! Thank you to the great people at Great British Chefs for posting this recipe!
Ingredients:
For the Chocolate and Chilli Filling
- 350ml of double cream
- 150ml of milk
- 400g of 70% dark chocolate, chopped in to pieces
- 3 to 4 tsp of chilli flakes
- 2 eggs, beaten
For the Pastry
- 250g of plain flour
- 100g of icing sugar
- 1 egg yolk
- 1 egg
- 125g of unsalted butter, keep any extra for greasing your tin
- 35g of ground almonds
To serve
- Crème Fraiche
- The zest of 1 lime
Instructions:
Step 1-Start making this delicious chocolate and chilli tart by preparing the pastry case. Add the flour, unsalted butter, ground almonds and icing sugar in to a mixing bowl. Add the egg and mix together well without using your hands when possible. Once it is well mixed, wrap it up in a piece of cling film and place it in the fridge for around 1 hour.
Step 2-Now the pastry is prepared and put to one side, you can start preparing the delicious filling. Add the 150ml of milk and 350ml of double cream to a saucepan and bring to the boil. Once it has reached this point, add the chilli flakes, take it off the heat, and allow the mixture to soak up the flavour of the chilli for about an hour.
Step 3-Take your loose base tart tin and grease it with some of the leftover unsalted butter. Take the pastry out of the fridge and push it in to the corners of the tin ensuring it is evenly spread out. Line with baking paper and fill with baking beads ready for baking.
Step 4-Set your oven to 190 degrees celcius/Gas mark 5 and once it has heated, bake the pastry for around 10 minutes until it is a delicious golden brown colour. Take the baking beads out carefully and return to the oven for another 10 to 15 minutes to ensure the base cooks. Again, once the base turns a golden brown colour, you will know it is finished. Once you are happy the pastry is cooked, take it out of the oven and glaze it with the egg yolk. This will seal the pastry ready for the chocolate and chilli filling later on.
Step 5-Now you can move on to the chocolate mixture which will form part of the filling. Take the 400g of dark chocolate and add it to a mixing bowl. Take the chilli cream which should have been infusing for the past hour and bring it back to the boil. Once it has reached the right temperature, pour it over the chocolate and stir in until the dark chocolate is completely melted. Add the beaten eggs in at the end and mix in.
Step 6-Turn your oven down to around 150 degrees celcius/Gas mark 2. Take the chocolate filling and pour it in to the pastry case you prepared earlier. Place it in the middle of your oven carefully and allow it to cook for 15 to 20 minutes until the filling is set. Once you are happy the mixture is set, take the tart out of the oven and allow to cool on the side, but do not put it in the fridge.
Step 7- We’re nearly there now! It is time to serve this delicious chocolate tart. Slice the tart with a knife and serve it with a serving of crème fraiche and the zest of a lime. Now you can take a bite of this delicious chocolate and chilli tart and you’ll love it!
Source: Great British Chefs
Products You May Find Helpful
From May 25th to May 31st, it is National BBQ Week here in Britain, so we’re hoping these barbecued chicken kebabs will encourage you to invite your family and friends round for a barbecue this bank holiday weekend.
If you are looking to capitalise on the fantastic weather we have been forecast for this bank holiday and the following week, then you should celebrate National BBQ Week by firing up the BBQ and making some of these marinated chicken kebabs. The recipe is one of Jamie Oliver’s own and it is a beauty! It is the perfect recipe to get the kids involved in, we guarantee they will enjoy arranging the skewers ready for cooking!
Ingredients:
For the Chicken Kebabs
- 500g of boneless chicken breasts
- 4 courgettes, sliced thinly lengthways
- 6 to 8 skewers
For the Marinade
- 1 handful of fresh coriander
- 1 handful of fresh mint
- 6 spring onions
- 3 cloves of garlic
- 1 red chilli
- The juice and zest of 1 lemon
- Sea salt
- Black pepper
- Olive oil
Instructions:
Step 1-Start by cutting the chicken breasts in to 2.5cm chunks and place in a bowl. Add the sliced courgette to boiling water and cook for no more than 30 seconds before removing, draining and allowing it to cool.
Step 2-Add all of the marinade ingredients apart from the olive oil to a food processor and mix. You are looking for the marinade ingredients to reach a paste consistency, so once you have blended them, add a bit of the olive oil to help bind together.
Step 3- Once you are happy with the paste, add it to the chicken chunks and allow the meat to soak up the marinade for at least an hour.
Step 4-Now you can start to prepare the skewers. Between each piece of chicken, add a piece of the courgette to the skewer and continue until each skewer is nearly full, be careful not to overfill the skewers!
Step 5- Fire up your barbecue and grill these delicious marinated chicken kebabs for about 5 minutes. It is important that you regularly turn each skewer while they are cooking to ensure an even cooking process.
Step 6- Once you are happy that these barbecued chicken kebabs are cooked, they are ready to serve alongside all the other delicious barbecue food you have prepared!
Source: Jamie Oliver
It’s British Tomato Week and at this time of year there aren’t many better tastes than our own British grown tomatoes! This simple tomato filo tart recipe is bursting with flavour and perfect to make as an accompanying dish for a main meal!
From May 19th to May 25th, it is British tomato week and these delicious little vegetables are something we should be proud of here in Britain. This recipe for a tomato filo tart is extremely simple to make, and is the perfect alternative to serving garlic bread with your main meal. All you need to make this recipe is filo pastry sheets, plum tomatoes, feta cheese, fresh thyme and rosemary, olive oil and kosher salt. The whole process from preparation to serving takes about 40 minutes, and a majority of that is cooking time. So why not enjoy tomato week at home by giving this tomato filo tart a go!
Ingredients:
- 7 sheets of filo pastry
- 8 plum tomatoes
- 1/4 of a cup of crumbled feta
- 1 tsp of chopped fresh thyme
- 1 tsp of chopped fresh rosemary
- 5 tbsp of Olive Oil
- 1/4 tsp of kosher salt
Instructions:
Step 1- We think this recipe is the perfect way to celebrate British tomato week! Start by preheating your oven to 190 degrees Celsius/375 degrees Fahrenheit. Unroll the filo pastry sheets and cover with kitchen towel. Take a baking sheet and brush with olive oil and place a sheet of the filo pastry on the baking sheet before brushing with more olive oil. Top with another sheet of filo pastry and again brush with olive oil. Repeat this process until all the filo pastry has been used.
Step 2-Take the slices of plum tomato and arrange on top of the filo pastry in a single layer. Ensure that you leave about ¼ of an inch gap around the edge of the pastry.
Step 3- Add the feta cheese over the top, along with the chopped thyme and rosemary. Season with salt and pepper to taste and drizzle any olive oil that is left over the top.
Step 4-Place in the oven and bake for around 30 minutes. You will know when the tart is done as the pastry will turn a delicious golden brown colour and the edges will start to crisp. Allow the Tomato Filo Tart to cool for 5 minutes before cutting in to a dozen pieces or so to serve. Now all there is left to do is enjoy a piece of this fantastic Tomato Filo Tart!
Source: Health.com
Products You May Find Helpful