If you want to bake a delicious treat for someone special, or whether you enjoy a bit of variation in what you bake, this chocolate heart cake recipe is guaranteed to satisfy your every baking need.

Valentines Day is a special occasion, as it is a great excuse to show the special person or people in your life how much you care about them, and this Chocolate Heart Cake will do exactly that! The combination of flavours will leave your mouth watering and it doesn't even take that long to bake!


Ingredients:

  • 180g soft butter
  • 180g caster sugar
  • 180g self-raising flour
  • 30g of cocoa powder
  • 3 large eggs
  • 2 tbsp of milk

For the Filling

  • 200ml of double cream
  • 150g of raspberries

For the Icing

  • 100g of dark chocolate
  • 30g unsalted butter
  • 2 tbsp of raspberry jam

Instructions:

Step 1- Preheat your oven to 180C/350F/gas mark 4/160 fan.

Step 2- Grease the base of an 8 inch heart shaped tin. A round cake tin is fine if you don’t have one.

Step 3- Mix the soft butter, caster sugar, self-raising flour, cocoa powder, eggs and milk in to a mixing bowl using a whisk, or if you are feeling particularly fancy, an electric whisk. Once it is all mixed together, empty the mixture in to the heart shaped tin. Bake the cake for 35-40 minutes until it rises well, and remove it from the tin and place on a cooling rack.

Step 4- Cut the cake in to two pieces so you are able to include the filling. To make the filling, whip the double cream until thick, and fold in the raspberries. Spread the mixture of the cream and raspberries over the bottom half of the cake, then add the top layer of the cake.

Step 5- To make the icing, add the 2 tbsp of raspberry jam to a pan and melt until it is runny, and then spread over the top layer of the cake.

Step 6- Then add the chocolate and unsalted butter to a small bowl and melt it over hot water. Ensure that the bowl doesn’t come in to contact with the water. Once this is complete, allow the mixture to cool.

Step 7-Once the mixture has cooled, spread it over the top of the cake ensuring that none of the mixture goes on the side of the cake. Let the icing set for an hour or so, and then you are ready to serve.

Step 8-We recommend serving with some double cream, or ice cream, enjoy!

Source: Annabel Karmel 

Products You May Find Helpful

Heart Shaped Cake Tin
£5.47 inc V.A.T.
Large Cooling Rack
£3.60 inc V.A.T.

Orange Drizzle Loaf

Though Jaffa Cakes are the subject of much debate (is it a cake or a biscuit? We’d go for cake personally), it is difficult to argue with their household name status.

If you are a fan of the sweet and tangy combination of chocolate and orange then this delicious loaf is most certainly one for you! This moist and fruity cake will get everyone talking, and we’re sure it will become a firm favourite in your household.


Ingredients:

  • 140g butter, softened
  • 200g self-raising flour
  • 1 1/2 tsp baking powder
  • 200g golden caster sugar
  • 3 large eggs
  • 6 tbsp milk
  • Finely grated zest 1 large orange
  • 3 tbsp orange juice
  • 50g golden caster sugar
  • 50g dark chocolate

Instructions:

Step 1 – Preheat your oven to 180C or gas mark 4. Butter and line the base of your loaf tin. Put all of your cake ingredients into a bowl and beat with a hand whisk, wooden spoon or an electric whisk if you’re feeling a little lazy. Beat the mixture for around 3 – 5 minutes until the mixture is light and fluffy.

Step 2 - Then gently spoon the mix into the tin and make sure the top is flat and level.

Step 3 – Bake your mixture for around 40 – 50 minutes or until golden brown and firm to touch.

Step 4 - Heat the orange juice and caster sugar in a small pan on a low heat. Stir until the mixture is completely dissolved.

Step 5 - When your cake is completely cooked, remove it from the oven and lightly spoon over the orange mix. Leave the cake to cool in the tin then remove and cool completely on a wire rack.

Step 6 – Break up the chocolate and melt over a pan of simmering water or in the microwave for around 1 – 2 minutes. Drizzle over the cake and leave to set. (Alternatively, you may prefer to use icing, as shown in the photo above.)

Step 7 – Serve and enjoy!

Source: BBC Good Food 

Products You May Find Helpful

1lb Loaf Tin
£4.56 inc V.A.T.
2lb Loaf Tin
£5.32 inc V.A.T.
Loaf Tin
£9.06 inc V.A.T.

Baking is a fun and exciting family-friendly activity that all ages can enjoy, especially when the end product is so delicious. That's why we love this BBC Good Food recipe for Delicious Sweet Buns. It's a great way to get children excited about cooking and the sweet buns are simply delicious!

These Delicious Sweet Buns are soft, tasty and filled with a delicious filling; the perfect after dinner treat.

Ingredients:

For the Dough

  • 250g plain flour
  • 5g yeast
  • 25g sugar
  • 1/2tsp salt
  • 110ml warm water
  • 1 whole egg, beaten and then divided
  • 25g butter, softened

For the Filling

  • 1/4 cups strawberry jam
  • 1/4 cups candied mixed fruit

Instructions:

Step 1: In a large mixing bowl add the flour, yeast, sugar and salt. Mix for 1 minute (by hand or using an electric whisk). Add the water and half of the beaten egg mixture. Mix once again until you get a thorough consistency. Add butter and mix in until combined. Knead by hand until smooth and elastic. This should take about 10 minutes.

Step 2: Cover the dough and pop it in a warm place for about 30 minutes to let it rise. After that, punch the dough down and roll out 8 balls. Allow them to rise for 10 minutes.

Step 3: Take each ball and roll out with a rolling pin until you have a nice thin disk (roughly 3 inches in diameter and a 1/4 inch thick).

Step 4: Place some strawberry jam and sprinkle some candied mixed fruit on the top of the disk. Wrap and cover the filling from all sides with the dough before pinching the seams to close. Next shape the dough into a ball shape. Using shark scissors snip the top surface of the dough a bit to form petals shaped like a flower (see picture). You can use the scissors to form a variety of fun shapes, all of which look great!

Step 5: Place buns on a greased metal tray and allow them to rise for 20 mins. Then brush the remaining beaten egg over the top of the buns. Bake at 200c for 20 minutes or until golden brown.

Source: http://www.bbcgoodfood.com/recipes/1913636/homemade-sweet-buns 

Products You May Find Helpful

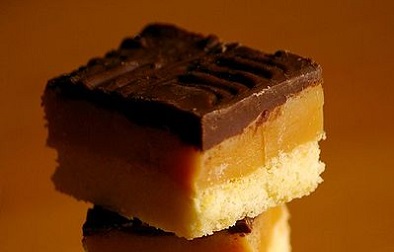
Millionaire's Shortbread

Millionaire’s shortbread is a delicious, three-level treat: rich chocolate, creamy caramel, and a pleasantly crunchy layer of biscuit, all in one amazing package!

Why is it called Millionaire’s shortbread? Because the ingredients are rich, and it tastes like a million dollars! Still, it won’t taste like two cents unless you make it right, so follow our easy recipe and make sure that your shortbread is as sumptuous as it should be!

Photo by Aurore D (view original here)


Ingredients:

  • 100g chocolate (milk or dark)
  • 120g caster sugar
  • 170g flour
  • 240g butter
  • 2tbsp golden syrup
  • 400g condensed milk

Instructions:

Step 1 - Preheat your oven to 170oC.

Step 2 - Grease a square cake tin with butter or margarine.

Step 3 - Sieve the flour into a bowl, along with half (60g) of the caster sugar.

Step 4 - Using your hands, rub half (120g) of the butter into the bowl until the mixture forms into dough.

Step 5 - Spread this dough evenly across the base of your square cake tin. Prick the dough all over using a fork.

Step 6 - Put the dough in the preheated oven for 15 minutes. It should be golden brown by the end of the cooking period.

Step 7 - Once the cake tin is in the oven, it's time to make the caramel! Place your condensed milk, your golden syrup, and the remaining sugar and butter in a saucepan. Use a low flame and stir continuously.

Step 8 - Is the caramel properly mixed? If so, remove it from the hob and - once your dough is out of the oven - pour it into the cake tin, covering the dough evenly. Leave to cool for half an hour.

Step 9 - While the caramel cools, boil some water on the hob. Break your chocolate into small pieces and place these pieces in a glass bowl. Set the bowl over the boiling water to melt the chocolate.

Step 10 - Once your caramel has cooled, pour the melted chocolate over the top to form that delicious third layer. Pop the finished product in the fridge for a while, and when it's cooled down properly, cut into squares.

Products You May Find Helpful

£6.59 inc V.A.T.
£7.40 inc V.A.T.
£6.36 inc V.A.T.

Tarte Tatin

Tarte Tatin is an absolute winner of a French dessert that's ideal for ending a dinner party with some serious style! It's a sumptuous celebration of apples and caramel, invented by a pair of French sisters and beloved by foodies everywhere ever since.

Now, a lot of people will tell you that tarte Tartin is tricky to make, and yes, it can be downright fiendish to get the recipe right. However, we're big fans of simplicity here at British Bakeware, and we've come up with an easy way to get the tarte right - you'll be amazed at how effortlessly it all comes together!

So, without further ado, here is our  Cheater's Guide to Tarte Tatin...


Ingredients:

  • 1 Packet of Ready-Rolled Puff Pastry
  • 6 Medium Cox Apples (peeled, quartered and cored)
  • 50g Butter
  • 50g Golden Caster Sugar
  • ½ Tsp Cinnamon
  • Juice of ½ Lemon

Instructions:

Step 1 - Melt the butter in a medium grill pan, then stir in the sugar and cinnamon until the mixture caramelises. Add the apples and continue cooking on a medium heat for around 10 minutes, all the while basting the apples in the caramel. Remove the grill pan from the heat.

Step 2 - Unroll the packet of pastry and make a few small air holes in it using a fork. Lay the pastry over the apples, trimming any excess with a sharp knife or scissors, and tucking in the edges neatly around the apples.

Step 3 - Place the grill pan in a pre-heated oven for around 20 to 30 minutes at 200oC, or until the pastry is golden and delicious. To finish your apple masterpiece, run a knife around the edge of the pan, then place a plate over the top and quickly spin the dish over so the tart turns out beautifully onto your plate – voila!

Products You May Find Helpful