Happy St Patrick's Day everyone, and what better way to celebrate than this delicious Steak and Guinness pie!
We all know that the classic combination of steak and ale goes well together when it comes to making a pie, but the combination of steak and Guinness is mouth wateringly good! This recipe includes a rather small amount of ingredients but it certainly won’t lack in flavour. This steak and Guinness pie is something you can prepare and leave in the oven to cook while you carry on with something else, and a perfect way to celebrate St Patrick's Day 2016!
Ingredients:
- 675g of diced braising steak
- 4 sticks of celery
- 2 heaped teaspoons of plain flour
- 1 bottle of 500ml Guinness
- 1 small handful of herbs (rosemary, thyme and bay leaf)
- 1 carrot
- 2 400g tins of chopped tomatoes
- 500 of pre packed puff pastry
- 1 egg
- Olive Oil
Instructions:
Step 1-Start by taking the your beef and seasoning to taste with the salt and pepper. Sprinkle the beef with flour and ensure it is well covered.
Step 2-Pour 2 to 3 large glugs of olive oil in to heated casserole dish or frying pan and fry the beef until it is browned.
Step 3- Add in the onion and fry for a minute or so, then add the carrots, celery and the herbs in to the pan. Cook all of this for a further 5 minutes before adding in the bottle of Guinness.
Step 4-Add the chopped tomatoes and bring to the boil. Give it a good stir and allow it to slow cook for a further 2 hours until the meat is tender.
Step 5-After 2 hours check how it is doing. The sauce should have thickened and all of the ingredients should have provided a delicious flavour. Add further seasoning if you think it needs it.
Step 6-Now it is time to pre heat your oven. Set it to 190 degrees Celsius or gas mark 5. Place the meat filling and sauce in to a large pie tin.
Step 7-Roll out your puff pastry and place it over the pie tin. Please make sure it is slightly bigger than the tin itself.
Step 8-Beat the egg and then brush the edge of your tin with it. Place the pastry on top of the large pie tin and use the extra pastry around the outside of the dish to secure it. Use a knife to score the pastry on top and brush with more of the egg.
Step 9-Place the pie on a baking tray or in a roasting tin and place in the middle of your pre heated oven for around 45 minutes. You will know it is done when it turns a golden colour and starts to bubble around the edge of the pastry.
Step 10-Allow the pie to cool for a few minutes before serving, and that’s it! This delicious steak and Guinness pie is ready to be served. We recommend serving with some delicious new potatoes and some green beans!
Source: All Recipes
Products You May Find Helpful
To celebrate Chinese New year, we thought we would release this delicious Char Siu recipe! It is also referred to as Chinese Barbecue Pork, and this recipe is sure to be a popular choice to help the celebrations!
Char Siu combines a host of fantastic flavours including garlic, hoi sin sauce and sesame oil, bringing a real mix of sweet and sour flavours to the dish. This Char Siu Pork dish may look rather daunting in terms of preparation and cooking, but it is in fact rather easy to prepare. So if you are celebrating the Chinese New Year or just fancy cooking something different at home, give this Chinese Barbecue Pork recipe (Char Siu Pork) a go!
Ingredients:
For the Pork
- 800 grams of Belly Pork cut in to 3cm thick large strips
- 100g of Malt Sugar
- 25ml of Water (Cook water with the sugar until dissolved)
For the Pork Marinade
- 1 egg
- 1 tbsp of sugar
- 1 egg
- 1 tbsp of yellow bean sauce (mince taucho)
- 1 tsp of sesame oil
- 1 tbsp of Hoi Sin sauce
- 1/2 tbsp of chopped shallot
- 1 tbsp of Oyster sauce
- 1 tbsp of chopped garlic
- 1 tbsp of black sauce
- 2 tbsp of Chinese cooking wine
- 1 and a half pieces of Reddish cheese
Instructions:
Step 1-To start making this delicious Char Siu, wash your pork belly and pat dry with kitchen towel once you have done so. To allow the marinade to penetrate the meat, use a fork to pierce some holes in to the piece of pork. Take all the ingredients for the marinade and place them in a mixing bowl. Stir together until they are well mixed.
Step 2-Add the 3cm strips of the pork belly to the marinade and ensure each piece has a good covering of the marinade. Allow the pork to sit in the marinade for around 2 hours, or if you have the time, allow it to sit in the fridge over night.
Step 3-When you are ready to cook, take the pork belly out of the fridge and allow it reach room temperature for an hour or so before you start cooking. Preheat your oven to 220 degrees celcius.
Step 4-Take the 3cm strips of pork belly and place them on a roasting rack. Be sure to put a baking tray or roasting tin underneath the pork to catch any delicious juices that fall while it is cooking. Proceed to cook the pork for about 15 minutes.
Step 5-While the pork is happily cooking away, take any remaining marinade and cook it with the malt syrup on a low heat to form the Char Siu sauce, stirring well to avoid it sticking. You will notice the sauce is done when it starts to thicken nicely.
Step 6-Once the pork has been in the oven for 15 minutes, remove it from the oven and start to cover it with the Char Siu sauce you have just prepared. It is important to cover all of the meat with the sauce, so don’t forget to flip the meat over and cover the other side! Once you have done this, place the pork back in the oven for roughly 7 minutes. Repeat this process 4 times and cook the pork until it starts to become charred at the edges.
Step 7-Allow the meat to cool before cutting in to thick slices. Serve with any remaining sauce.
Step 6-That’s it, all there is left to do now is enjoy this delicious Char Siu Pork for Chinese New Year!
Source: Yummly
Products You May Find Helpful
Our final low fat recipe for the month comes in the form of these delicious oven baked fish and chips. They can be prepared and cooked in under and hour, so what are you waiting for, give it a go at home!
Fish and Chips are one of the classic British dishes and it is easy to see why! However this version puts a twist on the classic dish. This version is low fat fish and chips and the reason is because it is oven baked rather fried. The fish comes with a delicious breadcrumb topping, made up of parsley, lemon zest and fresh breadcrumbs, and the chips are made of floury potatoes so they are a lot lighter than your regular potatoes. So if you love fish and chips and want to try these oven baked fish and chips at home, take a look at this delicious recipe from BBC Good Food.
Ingredients:
- 880g of floury potatoes
- 4 sustainable white fish fillets, roughly 140g each
- 50g of fresh breadcrumbs
- The zest of 1 lemon
- 2 tbsp of chopped parsley
- 2 tbsp of olive oil
- 200g cherry tomatoes
Instructions:
Step 1-Preheat your oven to 220 degrees celcius/200 degrees in a fan oven/Gas Mark 7. Cut the potatoes in to chips, and pat them, dry using kitchen paper. Lay the chips on a baking tray in a single layer before covering with half of the olive oil, and seasoning with salt.
Step 2-Cook the chips for 40 minutes in total until they start to turn a golden brown colour. Turn the chips after 20 minutes to ensure they are evenly cooked.
Step 3-In a bowl, mix the breadcrumbs, lemon zest and parsley then season to your own taste with sea salt and black pepper. Once well mixed, top each fish fillet with some of the mixture and add the remaining olive oil.
Step 4- Place the fish fillets in a roasting tin and put them in the oven along with the chips for the final 10 minutes that the chips will need to cook. That’s it, the oven baked fish and chips is finished!
Source: BBC Good Food
Products You May Find Helpful

If you want a deliciously healthy and very fast meal for you and your family, these grilled lemon chicken kebabs are perfect! They can be prepared and cooked in under 30 minutes, which is perfect for when the family return home from work and school
The next instalment of our low fat recipes are these grilled lemon chicken kebabs with a side of gremolata. These kebabs may see simple, which they indeed are when it comes to preparation, but they are also bursting with flavour! The refreshing zest of the lemon is backed up by the sweet taste of the white wine vinegar and the fresh parsley. So if you are keen on trying a low fat recipe this month, and want something easy and tasty to ease you in, these grilled lemon chicken kebabs are perfect. Enjoy!
Photo by kae71463 (view original)
Ingredients:
- 2 chicken breasts
- The juice of 1 lemon
- 1 teaspoon of grated lemon zest
- 3 thick slices of lemon, quartered
- 55ml olive oil
- 1 clove of garlic, peeled and crushed
- 1 dessertspoon of chopped oregano
- 1 teaspoon of white wine vinegar
- 2 bay leaves torn in half
- Salt and black pepper for seasoning
For the Gremolata
- 1 garlic clove, peeled and chopped
- 1 teaspoon of lemon zest, grated
- 1 tablespoon of fresh parsley,chopped
Instructions:
Step 1-Preheat your grill at least 10 minutes before you plan to use it. Slice each chicken breast in to 5 rather chunky pieces, then place them in a mixing bowl with the lemon juice and the zest of the lemon, as well as the oregano, olive oil, garlic, white wine vinegar and as much of the salt and pepper as you want. Leave to marinate for as long as you want.
Step 2-Then start assembling the kebabs by threading half a bay leaf on to a skewer, followed by a quarter slice of lemon, then a piece of chicken. Repeat this until you have used all 5 pieces of chicken. Finish the end of the kebab with another half bay lead and another quarter slice of lemon. Ensure nothing will be able to fall off the kebab.
Step 3-Repeat with the other kebabs, and once finished, place them on a grill pan with a rack for 10 minutes before flipping them over and cooking for another 10 minutes on the other side. You will need to baste the kebabs when they are cooking, so have the remaining marinade ready. You will know the kebabs are done once they start to crisp at the edges.
Step 4-For the gremolata, combine the freshly chopped parsley, the lemon zest and the chopped garlic in another bowl. Once the kebabs are done, place them somewhere to keep warm.
Step 5-Take any remaining marinade plus the juices from the kebabs and put them in a saucepan. Reduce for a few minutes until it is the consistency of a syrup. Pour this on to the kebabs as well as the gremolata, and that’s it, all done! Now enjoy these deliciously healthy grilled lemon chicken kebabs.
Source: Delia Online
Products You May Find Helpful
This Roast Chicken and Sticky Carrots recipe is sure to be a hit with everyone in your family at Thanksgiving, Christmas or any other occasion! The flavour from the lemon, parsley and honey coupled with a delicious roast chicken will leave your mouths watering and we can’t blame you!
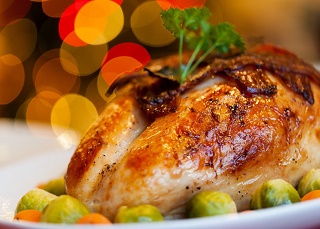
We can imagine that most of you have now started to decide what food you are going to get ready for Christmas! This Roast Turkey with Cranberry, Bacon and Walnut stuffing sticks to the traditional turkey meat at this time of year but there is an incredible addition of flavour from the cranberry, bacon and walnut stuffing!
Ingredients:
- 1 Higher Welfare Turkey, around 4kg
- 1 tablespoon of unsalted butter
- 6 rashers of bacon sliced in to small pieces
- 3 shallots peeled and finely chopped
- 2 sticks of celery, chopped
- 1 sprig of rosemary
- 1 large handful of dried cranberries
- 800ml Dry Cider
- 1/2 teaspoon of ground nutmeg
- 1/2 teaspoon of ground allspice
- Sea Salt and Ground Black Pepper
- 1 handful of chopped walnuts
- Zest of 1 Orange
- 300g pork sausage meat
- 1 free-range egg
- 2 big handfuls of breadcrumbs
- 100g of softened butter
- 300ml Fresh Organic Chicken Stock
- 1 teaspoon of cornflour
Instructions:
Step 1-We recommend that you start with the stuffing as this is pretty straight forward. In a pan, melt the butter and then add the bacon, celery, rosemary and shallots. Put a lid on and cook for 10 minutes or so until the vegetables are soft. Then add the cranberries and half (400ml) of the cider. Once this has reduced by about a third, leave it to cool for 15 minutes. Once cool, add the allspice, salt and ground black pepper, nutmeg, walnuts, orange zest, sausage meat and egg and fold in the breadcrumbs.
Step 2-Next stage is to prepare the turkey for roasting, or as we call it, the exciting bit! Preheat your oven to 240 degrees celcius/475 degrees Fahrenheit/gas mark 9. Ensure the turkeys’ skin is dry by patting it with kitchen roll, then take around half of the stuffing and put it in the neck end of the turkey. Rub the skin with the softened butter and add more salt and ground black pepper to help crisp the skin. Place in a large roasting tin and cover the turkey completely with foil before placing it in the oven. Once the turkey has been in for around 15-20 minutes, turn the temperature of your oven down to 150 degrees celcius/300 degrees Fahrenheit/gas mark 2. Baste the turkey for a few minutes before allowing it to cook for another 2 and three quarter hours.
Step 3-Once you have an hour or cooking time left, take the foil off the turkey to help finish the cooking process. Check the turkey is cooked by piercing the meat at the thickest point. If the juices run clear then it is cooked. Take the turkey out of the oven, recover it with foil and place on a roasting rack to cool for 30 minutes.
Step 4-Add the fat from the meat to your roast potatoes, you can also cook the remaining stuffing to serve on the side or leave it for another time.
Step 5-Turn your oven back up to 200 degrees celcius/400 degrees Fahrenheit/gas mark 6. Add the remaining 400ml of cider to the meat juices in the roasting tin and enough chicken stock to comfortably cover the bottom of the roasting tin. Dissolve the cornflour in a little water and stir in to the roasting tin and simmer on the hob until it starts to thicken.
Source: Jamie Oliver
Products You May Find Helpful